Help centre · Server-side tagging with Stape
Carry consent into your server container
Host a Google Tag Manager server container on Stape and check that the choice Velo collects in the browser arrives with every request.
How consent reaches your server
Velo works in the visitor’s browser. It sets the Google Consent Mode default when the page starts and updates it when the visitor chooses. Google tags add that consent state to every request they send, including the requests they send to your own server container.
So there is nothing of Velo to install on the server. You set up Consent Mode once, in the web container, and the server container reads what arrives. Google describes this in its consent guide for server-side tagging.
Before you start
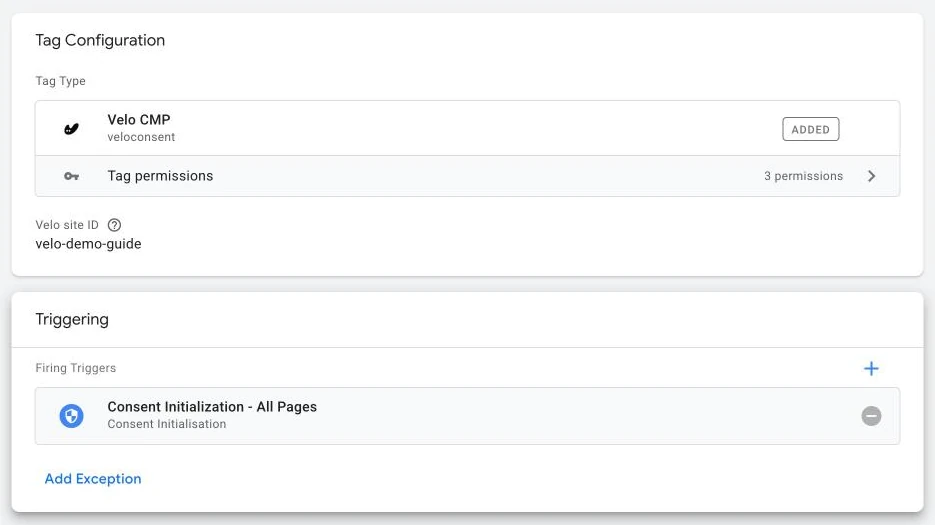
- The Velo CMP tag fires on Consent Initialization - All Pages in your web container. The GTM installation guide covers this.
- You can create containers in your Google Tag Manager account.
- You have a Stape account.
Create the server container
- In Google Tag Manager, open Admin and click + in the container column.
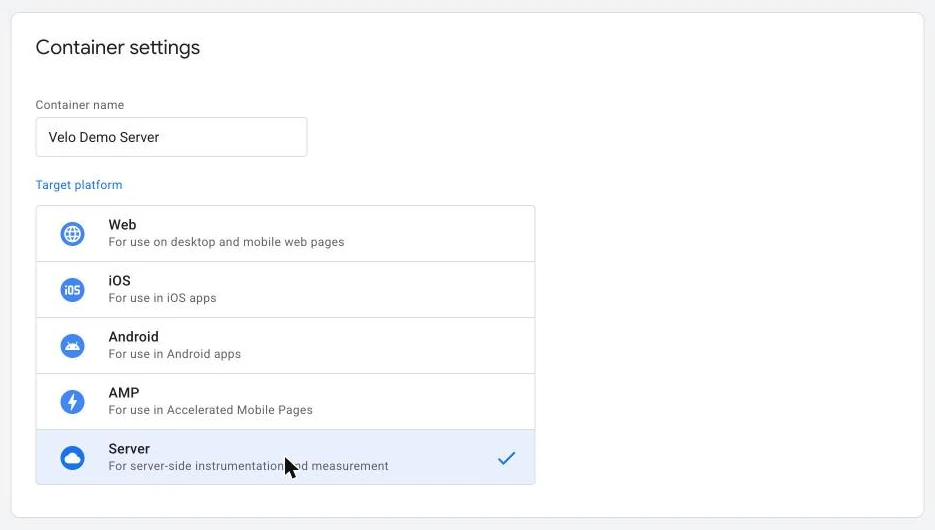
- Name the container, choose Server as the target platform and click Create.
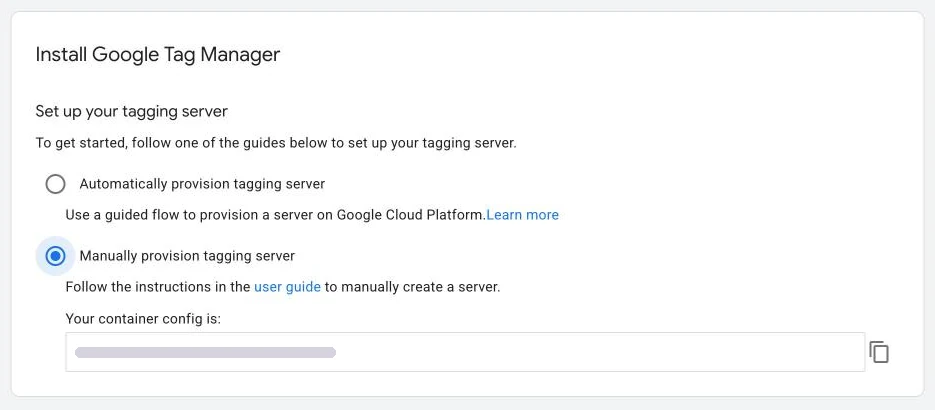
- In Install Google Tag Manager, choose Manually provision tagging server and copy the container config.
Host the container on Stape
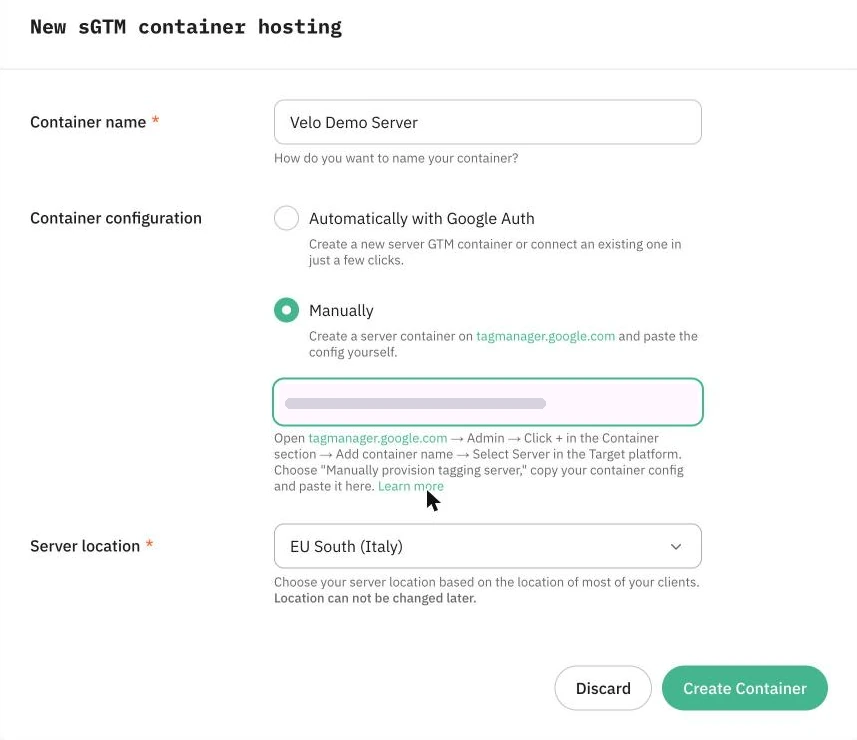
- In Stape, click Create sGTM container and choose Manually.
- Enter a Container name. Under Container configuration, select Manually and paste the container config.
- Choose the Server location closest to most of your visitors. It cannot be changed later.
- Click Create Container and pick a plan. The free plan was enough for our test.
- On the container page, wait for the status Running, then copy the Built-in container URL under Domains (Tagging Server URLs).
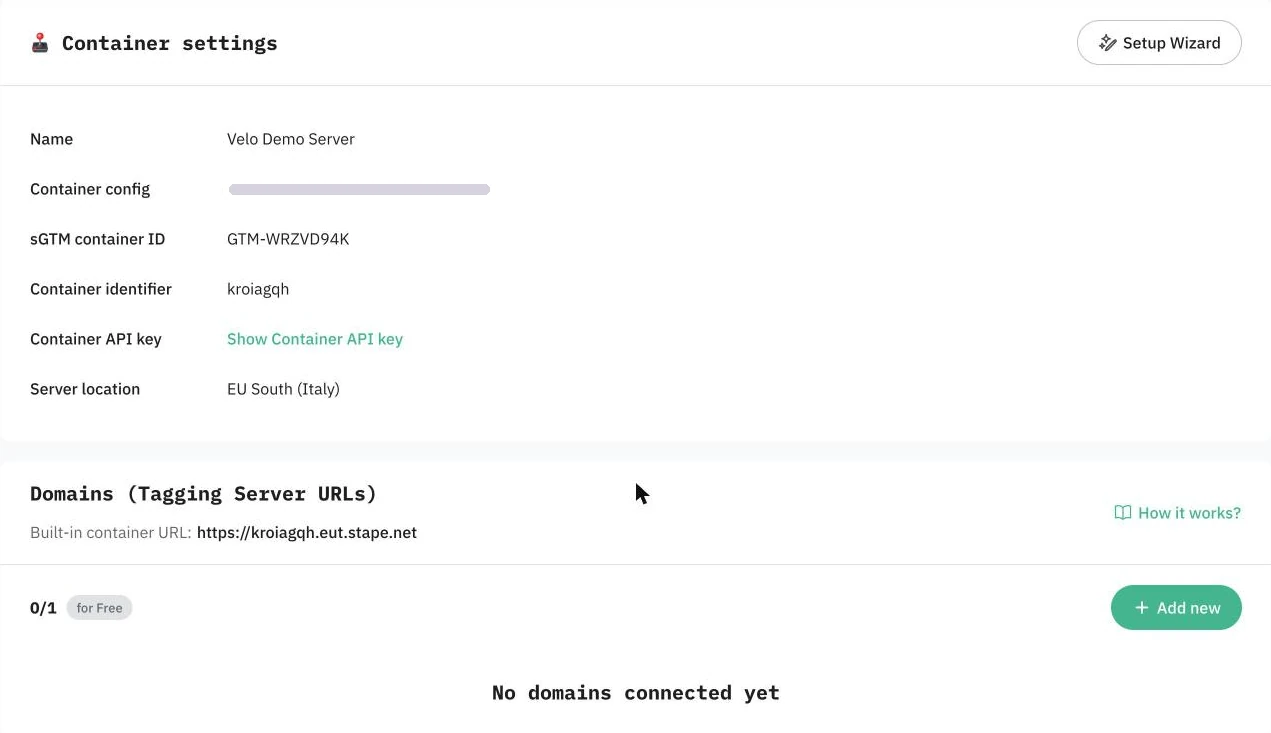
For a live site, add your own subdomain with Add new under Domains, so requests go to your domain. Stape’s setup guide covers the DNS records.
Connect your containers
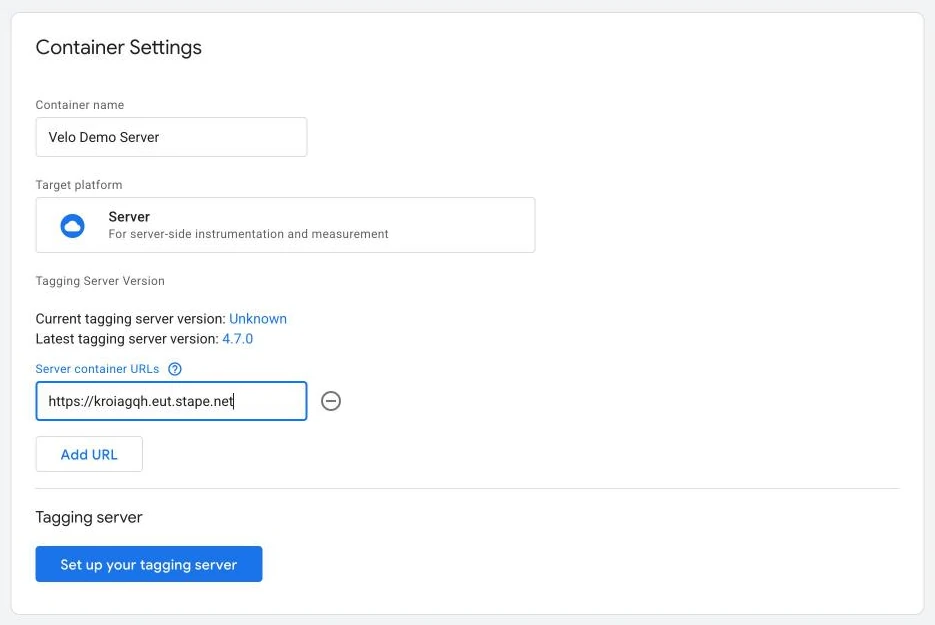
In the server container: open Admin → Container Settings, click Add URL under Server container URLs, paste the Stape URL and save.
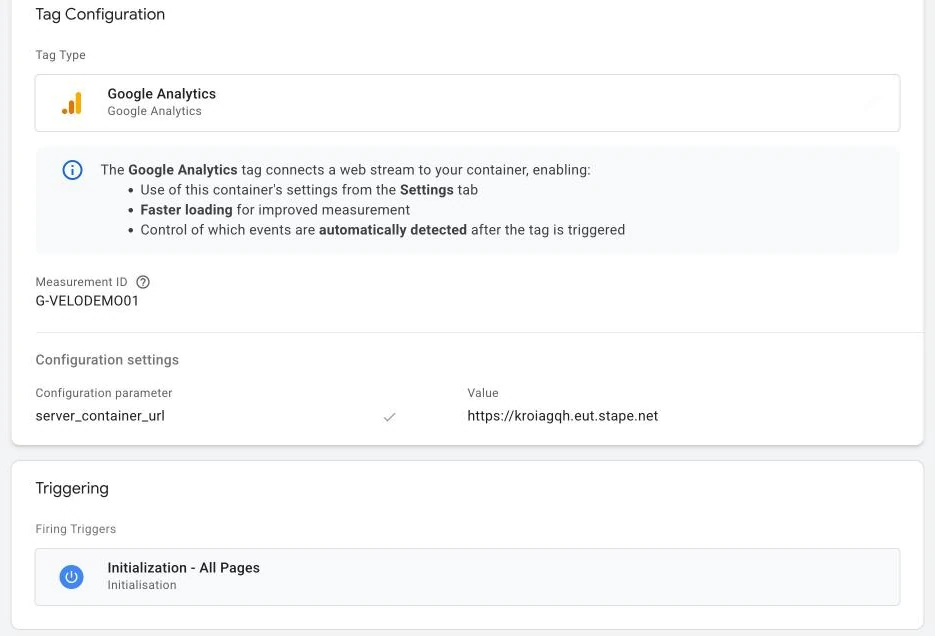
In the web container: open your Google Analytics tag, expand Configuration settings, click Add parameter and add server_container_url with the same URL as its value. Keep the tag on Initialization - All Pages. Google’s documentation calls this tag the Google tag.
Back in the server container: a Google Analytics: GA4 (Web) client is already installed and claims the incoming requests. Add the server tags you need, following Google’s guide to sending data to a server container. Publish both containers when your tests pass.
What the server receives
| Visitor | Sent with the request | Server preview |
|---|---|---|
| Has not chosen yet | gcs=G100 | ad_storage and analytics_storage Denied |
| Clicks Accept all | gcs=G111, and Google Analytics sends the page view again | ad_storage and analytics_storage Granted |
A visitor who rejects stays in the denied state. In the server container’s preview the values appear under Event data as x-ga-gcs and x-ga-gcd.
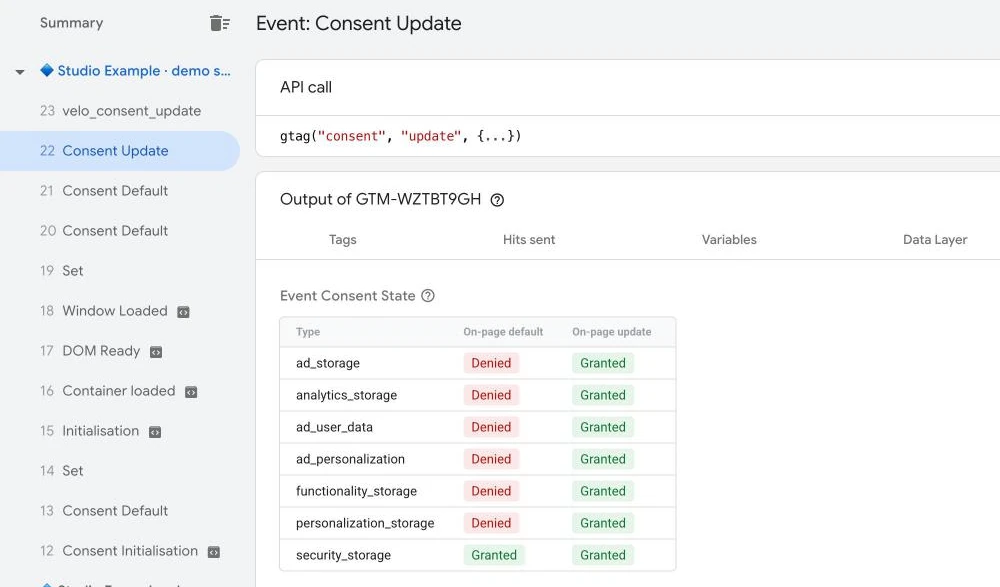
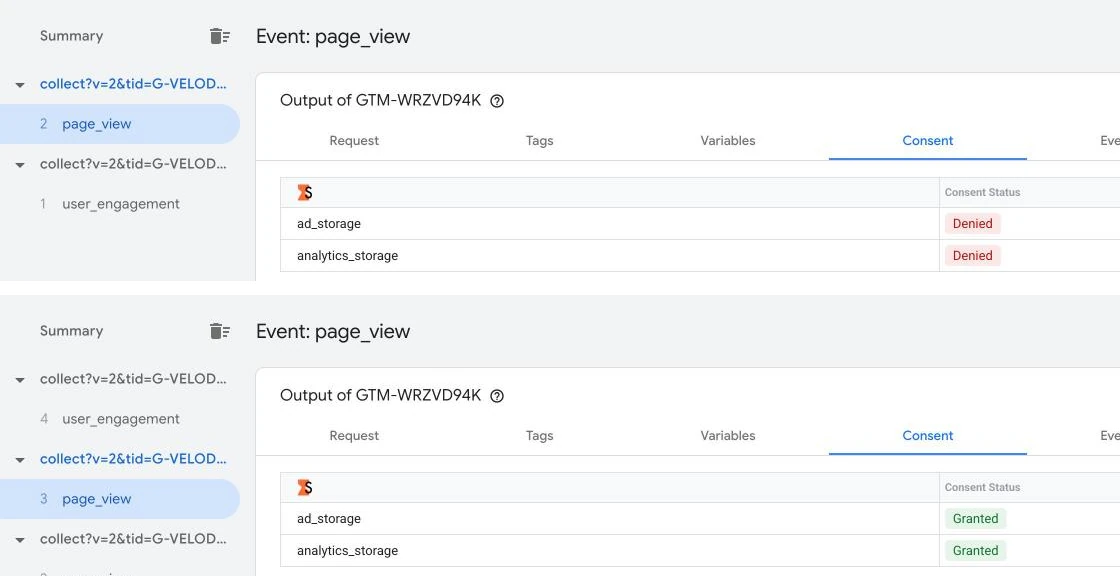
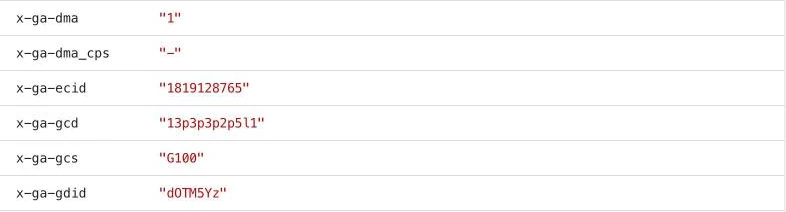
Google’s own server tags read this state. With consent denied, Google Analytics sets and reads no cookies, and Google Ads tags do not read or write advertising cookies. Google lists the behaviour of each tag in its server-side consent guide.
The preview’s Consent tab also says Consent not configured. That line is about the server container itself, which sets no consent state of its own. The table above it shows the state that arrived with the request.
Make other vendors’ tags check consent
Server tags for other vendors, such as Meta Conversions API or TikTok Events API, do not follow Google’s consent state on their own. Each one has to be told to check it.
In Stape’s Facebook Conversion API tag, open Tag Execution Consent Settings and select Send data in case marketing consent given. The default is Send data always.
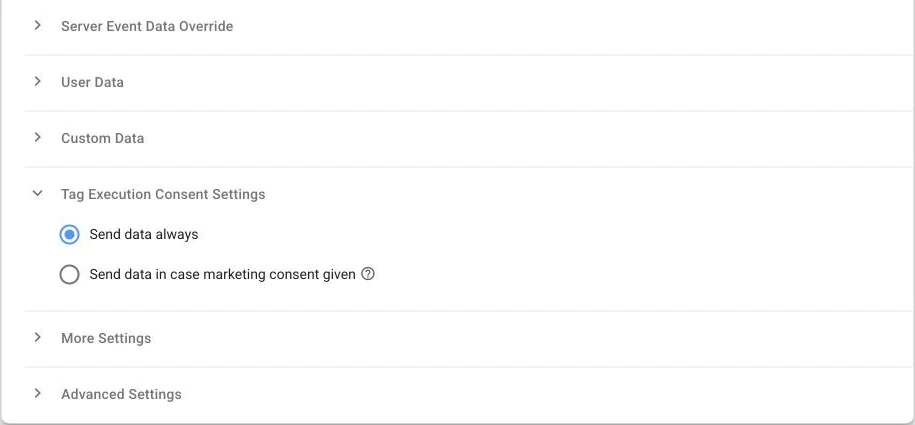
For any other template, look for a consent setting in its documentation. Then test a rejected visit in the server preview and confirm the tag did not fire.
Check the result
- Open Preview in the web container and load your page in a fresh session. In Tag Assistant, open the Consent tab: in an opt-in region the on-page default shows Denied.
- Open Preview in the server container in the same browser. The page view arrives with ad_storage and analytics_storage Denied.
- Click Accept all in the Velo banner. Tag Assistant shows the on-page update as Granted, and a new request arrives on the server as Granted.
- Start a fresh session, click Reject and confirm that server tags for other vendors do not fire.
- Repeat with a partial choice from Choose what to allow.
Things to watch
You load Google Tag Manager from your own domain.
Stape’s Custom Loader and similar setups serve gtm.js from your domain. Keep the Velo CMP tag on Consent Initialization - All Pages in that container, so the default is still set first. If Velo is installed with the direct snippet instead, follow the load order advice for tag gateway.
Google also asks you to enable region-specific settings when your server serves its scripts. Our test loaded gtm.js from Google, so check this yourself: from an opt-in country, the on-page default must show Denied. If it does not, tick Require opt-in in every region in the Velo CMP tag until the region settings work.
Your server sets cookies.
A cookie the server sets as HttpOnly cannot be removed by any script in the browser, Velo’s included. When a visitor withdraws consent, Velo deletes the well known cookies of the withdrawn categories that a script can reach. Make sure a server tag that sets a cookie checks consent before it does.
Velo’s debug mode shows no Google requests.
Debug mode recognises Google’s scripts and requests by their usual addresses. A custom loader that renames them can hide them from it. Use Tag Assistant and the server preview for this setup.
Still stuck?
Tell us where you got to and we will pick it up from there.