


Add Velo to
Google Tag Manager.
Install the Velo cookie banner and Google Consent Mode v2 with one tag from the Velo CMP template in Google’s Community Template Gallery. No code on the page, no Custom HTML. Configure the tag, set the trigger, publish. About ten minutes end to end.
Instructions and image sources reviewed 23 September 2026.
Install through
Google Tag Manager.
Start with a web container installed on your published site. Add the template from the Community Template Gallery, configure your site, and test consent before publishing the container.
Six steps · about ten minutes
-
01
Add the Velo CMP template
In your web container, open Templates → Tag Templates → New, then Search Gallery. Find Velo CMP, published by ampliodata, choose Add to workspace and confirm. The template source is public on GitHub.
Templates→Tag Templates→New→Search GalleryVelo CMP · Community Template Gallery
- Where
- Templates → Tag Templates → New → Search Gallery
- Search for
- Velo CMP
- Published by
- ampliodata
Verified gallery listing · 23 September 2026 Listing checked against Google’s public Community Template Gallery catalogue. The template source is public on GitHub.
Velo CMP in the gallery ↗ -
02
Create the tag
Open Tags → New and choose the Velo CMP template. Copy your exact Velo site ID from the dashboard, choose Light or Dark, and enter the Velo API endpoint from your installation settings to connect remote configuration and reporting.
Tags→New→Velo CMP templateVelo CMP · tag configuration
- Velo site ID
- Copy the exact site ID from your Velo dashboard.
- Banner theme
- Light or Dark
- Velo API endpoint (optional)
- Use the API endpoint shown in your Velo installation settings.
Verified template fields · 23 September 2026 Field names checked against the published Velo CMP template. Use your own site ID and API endpoint.
Velo CMP template ↗ -
03
Review the advanced options
Expand Advanced. Review url_passthrough and ads_data_redaction for your measurement setup; both default to off. URL passthrough adds measurement information to links, while ads data redaction removes advertising identifiers when ad_storage is denied. Test the options you enable. Leave copy overrides empty to use your dashboard configuration.
Advanced→url_passthrough→ads_data_redactionVelo CMP · advanced options
- url_passthrough
- Pass ad click information through URLs. Review whether this is appropriate for your setup.
- ads_data_redaction
- Redact ads data when ad_storage is denied.
Verified template fields · 23 September 2026 Both options default to off in the published template. Review and test them for your implementation.
Velo CMP template ↗ -
04
Fire on Consent Initialization – All Pages
Under Triggering, choose Consent Initialization – All Pages. This is GTM’s consent-specific trigger, which runs before other trigger types in the container. Save the tag, then verify the consent state and tag order in Preview, including any scripts loaded outside GTM.
Triggering→Consent Initialization – All Pages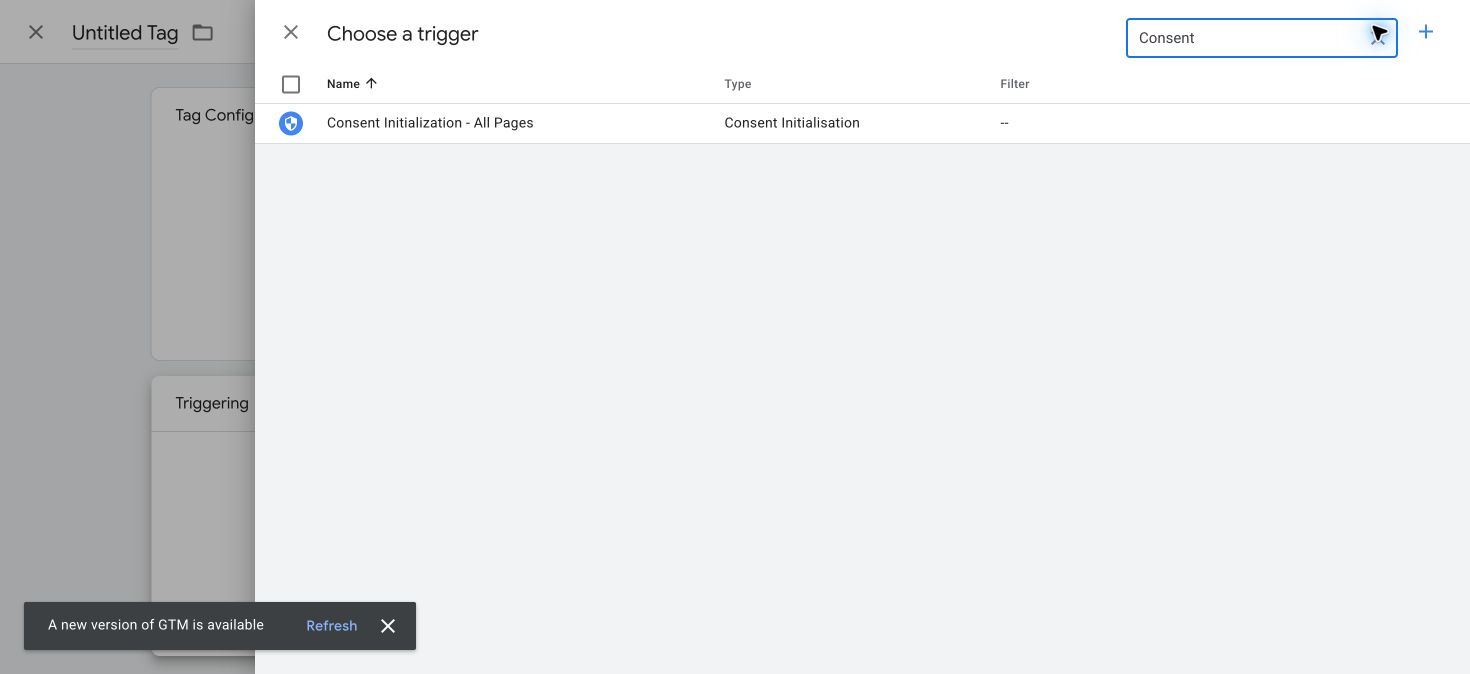
Live interface capture · 23 September 2026 Filter the trigger picker for Consent and select Consent Initialization – All Pages.
Google Tag Manager help ↗View full size ↗ -
05
Enable the consent overview
Open Admin → Container Settings, enable consent overview and save. This adds the overview to the Tags screen so you can review each tag’s consent configuration. It does not turn Consent Mode on; consent defaults and updates come from your consent tag.
Admin→Container Settings→Enable consent overview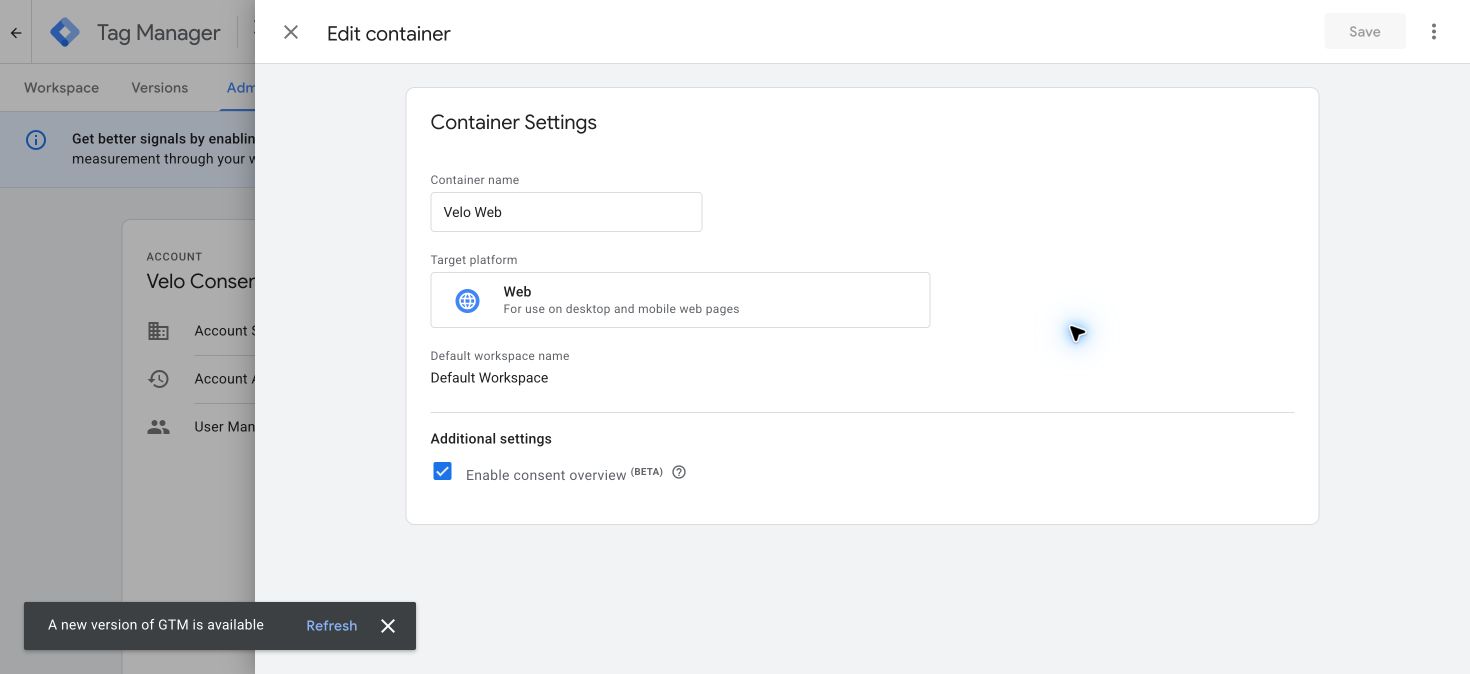
Live interface capture · 23 September 2026 Enable consent overview adds the consent overview to the Tags screen; it does not enable Consent Mode itself.
Google Tag Manager help ↗View full size ↗ -
06
Preview, then publish
Use Preview to check the Velo tag, initial consent state and updates after accepting or rejecting. Confirm non-Google tags follow the categories you configured. When those checks pass, open Submit, review all pending changes, add a version name and publish. Reload the published site in a fresh session and confirm signals reach your Velo dashboard.
Preview→Submit→PublishGTM · preview and publish
- Preview
- Check consent defaults and updates in Tag Assistant.
- Submit
- Review all pending container changes.
- Publish and Create Version
- Use a descriptive version name, then publish.
- Check live
- Reload the published site in a fresh session.
Verified configuration reference · 23 September 2026 Publishing checklist based on Google’s documentation. This is a configuration reference, not a screenshot.
Google Tag Manager help ↗
Gate any tag
on the decision.
Beyond Consent Mode, you can hold any tag until a category is granted. Three small pieces in the same container.
Tag wiring reference
- Data Layer Variable
- velo_categories
- Custom Event trigger
- velo_consent_update
- Tag condition
- Require the relevant category to be granted.
Still comparing options? Read why teams use Velo with Google Tag Manager, or see every supported platform.
Google Tag Manager questions,
answered.
What teams installing on Google Tag Manager ask first.
The banner does not appear.
Almost always one of two things: the tag is not on the Consent Initialization – All Pages trigger, or the container version was never published. Open Preview and check where the tag fires. The fix is usually visible in ten seconds.
Signals show granted by default in the EU.
Something else is racing Velo: an old CMP tag, a consent default snippet in a Custom HTML tag, or a gtag default hard coded in the page. Only one thing in the stack may set defaults. Find the other one and remove it.
Two banners show at once.
The direct velo.js snippet is also installed in the page markup. Use one install path, not both. If both are present, the attributes on the inline snippet win over the tag's configuration, which makes debugging confusing. Remove one.
My gated tag never fires.
Check the event name on the Custom Event trigger is exactly velo_consent_update, underscores and no typos, and that regex matching was not switched on by accident. Then confirm the condition reads the velo_categories variable, not the event name.
Is a Tag Manager install different from the snippet install?
No. Same banner, same Consent Mode wiring, same audit log, same dashboard. The template route just keeps the whole measurement stack in one container, which is why it is the path we recommend on every platform guide.
Can an agent do this for me?
Yes. Copy the prompt in Install with agents, just below, into Claude, ChatGPT, Cursor or whichever assistant you already use. It carries the template, the trigger, the gating pattern for tags Consent Mode does not cover, and the checks the agent has to run before it tells you the job is done.
Or hand it
to an agent.
Copy the prompt into Claude, ChatGPT, Cursor or whichever assistant you already use. It carries everything on this page: both routes, the order the tags have to load in, and the checks that prove it worked.
Paste this prompt into your assistant, then provide your site ID and the complete installation snippet or GTM settings from your Velo dashboard.
Working with an agent that reads the web? Point it at veloconsent.com/llms.txt and /install.md for the same context in plain text.
From the journal.
Website privacy, in one place.
Scan your site →