


Google Consent Mode v2,
set up from the start.
Velo gives your site a consent banner that meets Google's requirements, with Consent Mode v2 switched on from the first install. The consent default is in the snippet, a scan checks every page, and Velo support is there when a signal goes missing.
Set it up in
three steps.
From a new account to Consent Mode v2 you have checked, without writing a line of consent code.
Three steps from sign up to a checked Consent Mode set-up.
-
01
Create your free account
Sign up and add your website. Free covers one site and 1,500 sessions a month, with Google Consent Mode v2 included.
Sign up→Add your website -
02
Install with Consent Mode on
On the Install step, keep Enable Google Consent Mode v2 ticked and choose Google Tag Manager, the install we recommend: the eight steps below. No Tag Manager? Paste the snippet first in your page's head. Either way the consent default is sent with no other code.
Install Velo→Enable Google Consent Mode v2→Copy snippetInstall VeloEnable Google Consent Mode v2TickedConsent defaultSent by the snippetSignalsAll four, denied until a choice -
03
Check every page
Run a scan. The Consent Mode check tests the default, the four signals, the state before consent and the update after Accept all, on each page the scan opens. If something is wrong, we email you how to fix it.
Scanner→Consent ModeScanner · Consent ModeConsent default is set before Google tagsPassAll four Consent Mode v2 signals are setPassGoogle tags wait for consentPassAccepting updates consentPass
Prefer to set it up with your account manager? Agencies and Velo's team can switch Consent Mode on, set up the banner and install the snippet for you. Ask us.
How to enable Consent Mode
in Google Tag Manager.
We recommend installing Velo with Google Tag Manager. The Velo CMP template fires on Consent Initialization, before every other tag, so the Consent Mode default is always in place before your Google tags. Eight steps, about ten minutes.
Eight steps in Google Tag Manager, from the template to a published container.
-
01
Turn on the consent overview
In Tag Manager, open Admin, then Container Settings, and tick Enable consent overview under Additional settings. Save. It adds a consent view to the Tags screen, so you can see which tags check consent. It does not switch Consent Mode on by itself.
Admin→Container Settings→Enable consent overviewAdmin · Container Settings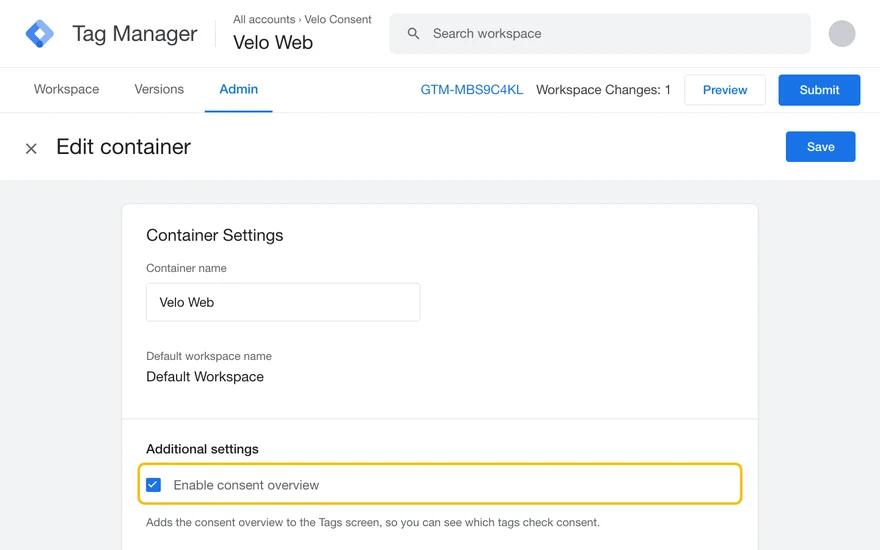
-
02
Add the Velo CMP template
Open Templates and choose Search Gallery under Tag Templates. Search for Velo CMP, pick the template published by ampliodata and choose Add to workspace, then Add.
Templates→Search Gallery→Velo CMP→Add to workspaceTemplates · Search Gallery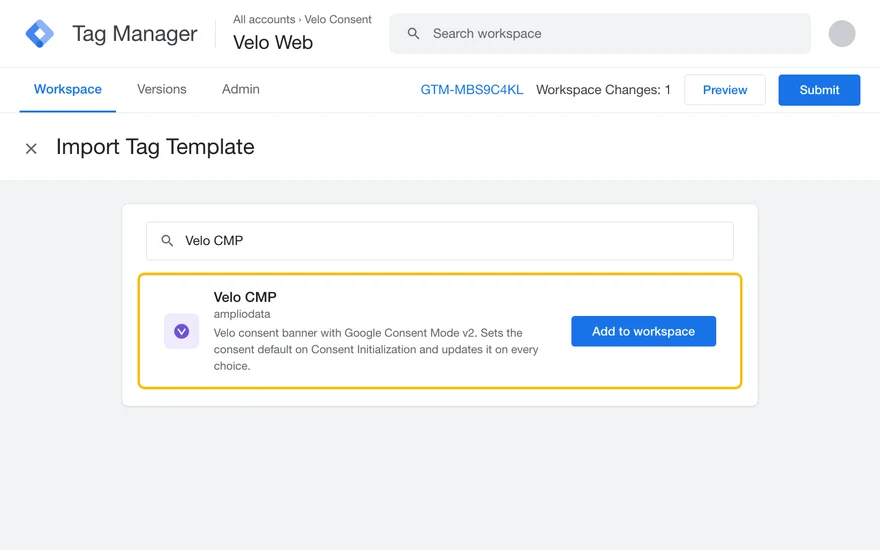
-
03
Create the Velo CMP tag
Open Tags, choose New, then Tag Configuration, and pick Velo CMP. Paste your Velo site ID and API endpoint exactly as they appear on the Install step in Velo, on its Google Tag Manager tab.
Tags→New→Tag Configuration→Velo CMPTags · New tag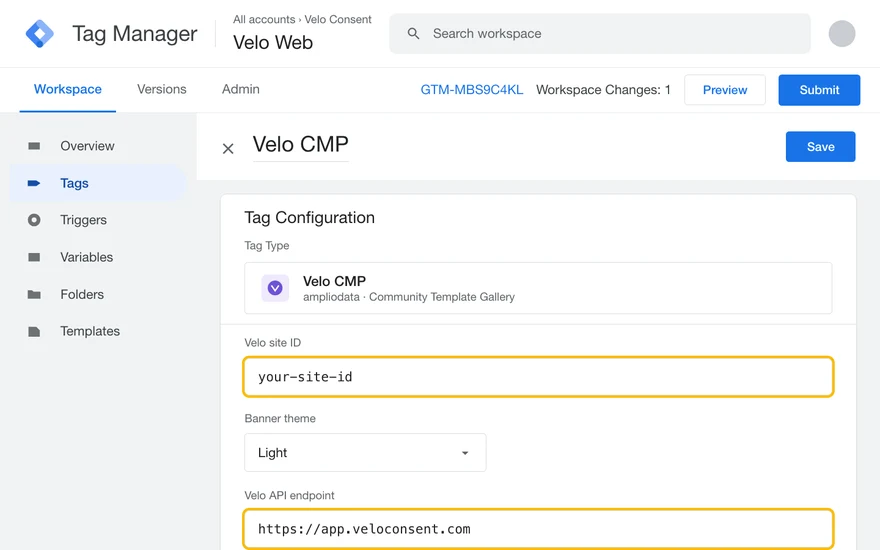
-
04
Keep Consent Mode on
Leave Basic consent mode unticked. That is advanced consent mode: Velo sets the Consent Mode default for all four signals before any Google tag and updates them on every choice. Tick Require opt-in in every region only if every visitor should start denied, not just where the law requires it.
Velo CMP→Basic consent mode→UntickedTags · Velo CMP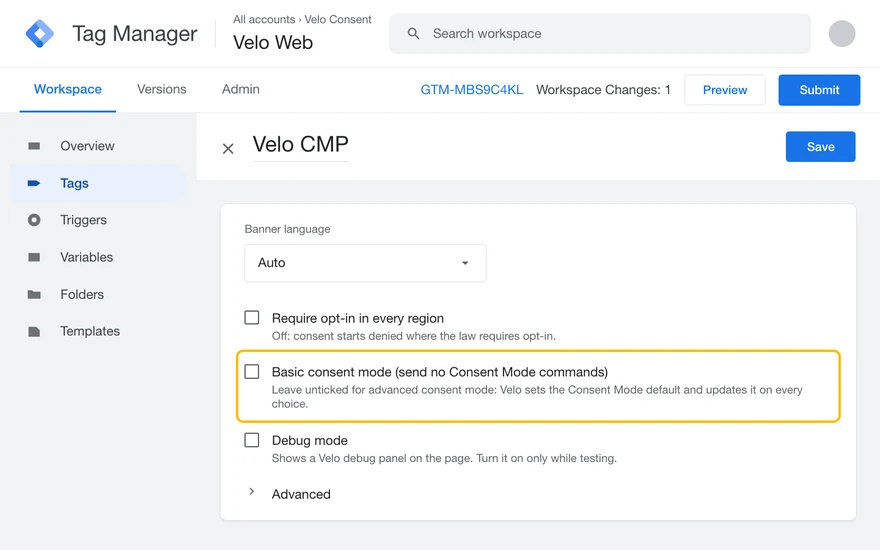
-
05
Fire it on Consent Initialization
Under Triggering, choose Consent Initialization – All Pages, then Save. It fires before every other trigger, so the default is in place before any Google tag. Do not fire the Velo tag on All Pages.
Triggering→Consent Initialization – All Pages→SaveTriggering
-
06
Check your tags' consent settings
Open Tags and the consent overview. Google tags such as the Google tag for GA4 and Google Ads have built-in consent checks and read the four signals themselves, so they need nothing more. Give any non-Google tag Require additional consent for its category.
Tags→Consent overviewTags · Consent Overview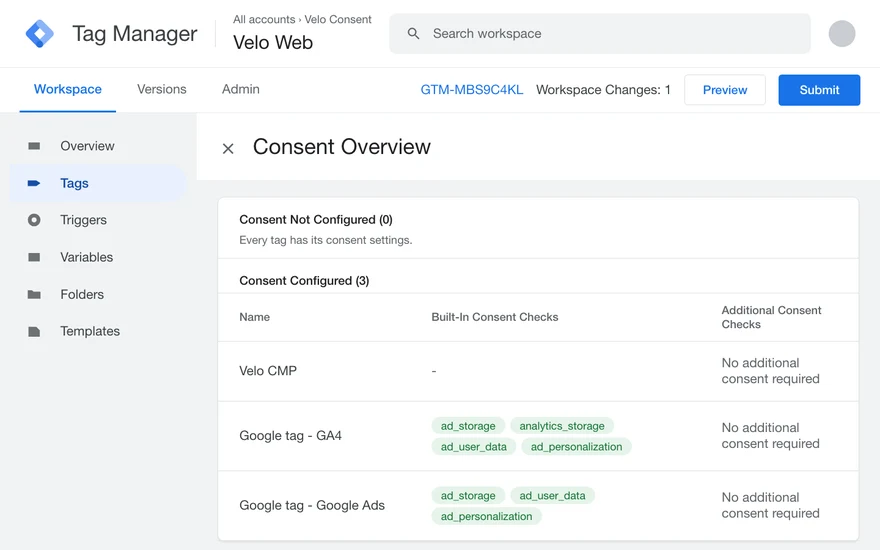
-
07
Preview it in Tag Assistant
Choose Preview and open your site in a fresh window. On the Consent Initialization event, the Consent tab should show an on-page default for all four signals, denied in an opt-in region. Choose Accept all on the banner: the next event shows them granted.
Preview→Consent Initialization→ConsentTag Assistant · Consent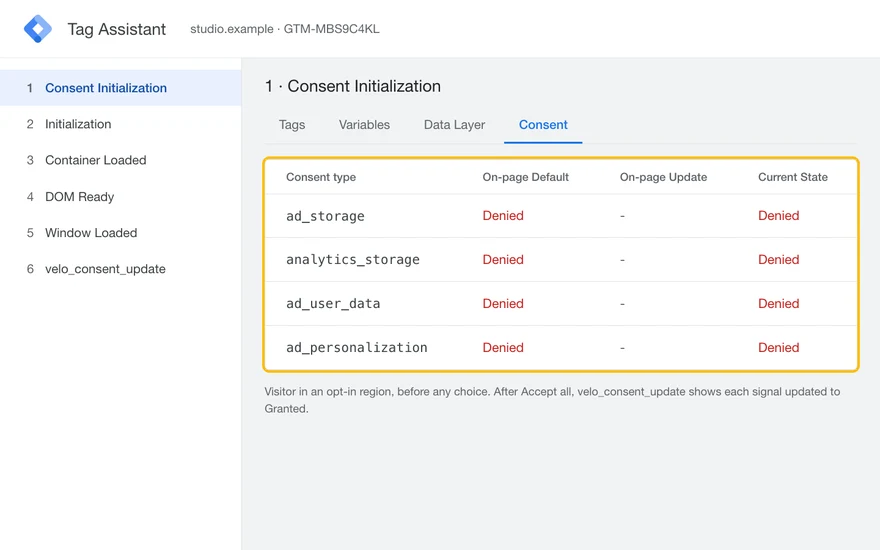
-
08
Submit and publish
Choose Submit, keep Publish and Create Version, give the version a name and choose Publish. Then run a scan in Velo: the Consent Mode check should pass on every page.
Submit→Publish and Create Version→PublishSubmit Changes
Screens drawn from Google Tag Manager with the Velo CMP template as published in the Community Template Gallery. Your account and container names will differ. The full install guide for every set-up is in Install Velo in Google Tag Manager.
What you
get.
Everything Google's tags need from a consent platform, on every plan, Free included.
A banner Google accepts
The default banner meets Google's technical requirements. You add only your own contact details: your privacy policy link.
Consent Mode v2, built in
The snippet sets the consent default before your Google tags and updates it on every choice.
Gaps found for you
The Scanner checks Consent Mode on every page it opens, debug mode checks a page as it loads, and we email you when a scan finds a problem.
Support from people
Velo support is your first contact for Consent Mode and TCF questions. A person replies with a technical first step.
Read the
guides.
How to set up a banner that meets Google's technical requirements, and how to check and fix Consent Mode.
Google's banner requirements
Each requirement, what Velo's default banner does about it, and the one thing you add.
Read the requirementsConsent Mode v2
The four signals, the tag order and how to test them in Tag Assistant.
Read the guideDebug mode
Check Velo sets consent before your Google tags, and fix a tag that loads first.
Turn it onGoogle tag gateway
Serve Google tags from your own domain and keep Velo's consent default first.
Check your set-upGoogle Tag Manager
Install the Velo CMP template on Consent Initialization, step by step.
Open the GTM guideConsent Mode support
How to reach us, how fast we reply and what support covers.
Get supportStart with Velo,
not Google.
Google tags missing Consent Mode or TCF signals? Velo support is your first contact. We set the consent signals on your site, so we can find the cause, and Google support asks for proof that you contacted your consent platform first.
A person replies with a technical first step, not an automatic acknowledgement. Business days are Monday to Friday, except public holidays in Spain.
Thanks, we have it.A person on the Velo team will reply with a first step to fix it.
Consent Mode
questions.
What Google advertisers ask before they set up Velo.
Do I need extra code to set the Consent Mode default?
No. The Velo snippet sends the Consent Mode default as soon as it runs, and the Velo CMP template does the same in Google Tag Manager. Put the snippet first in the head, or fire the template on Consent Initialization – All Pages.
Does the banner meet Google's requirements out of the box?
Yes. Accept all and Reject sit side by side, personalised ads are named with a link to Google's page on how it uses data, and visitors can change their mind at any time. Add your privacy policy link and you are done. See Google's banner requirements.
A scan says a Google tag loaded before Velo. What do I do?
First check whether that tag uses Google tag gateway: open your browser's developer tools, choose Network and reload. If gtm.js or gtag/js loads from your own domain, it does, and the tag gateway guide shows how to put Velo first. If not, move the Velo snippet above your Google tags.
Does Velo support the TCF?
Velo sends consent to Google through Consent Mode. It is not registered as an IAB TCF consent platform yet. See Velo and the TCF for the current status.
How do I enable Consent Mode in Google Tag Manager?
Add the Velo CMP template from the Community Template Gallery, create a Velo CMP tag with your Velo site ID and API endpoint, leave Basic consent mode unticked and fire the tag on Consent Initialization – All Pages. Then check the Consent tab in Tag Assistant and publish. The eight steps above show each screen.
Should I install Velo with Google Tag Manager or the snippet?
Google Tag Manager, if your Google tags already live there. The Velo CMP tag fires on Consent Initialization, before every other trigger, so the default always comes first and you manage consent next to the tags it controls. Without Tag Manager, paste the snippet first in the head of every page.
Who do I contact when Google tags are missing consent signals?
Velo support, before Google. We set the consent signals on your site, so we can find the cause. Google support asks for proof that you contacted your consent platform first. Use the form below or write to support@veloconsent.com.
How fast does Velo support reply?
Within 2 business days on Free and within 1 business day on Pro, Server and Custom, Monday to Friday. Most messages get an answer the same working day, and the first reply is a technical answer, not an acknowledgement.
Website privacy, in one place.
Scan your site →